Can anyone identify what the legs in this picture might be? Or what terms to
look for.
They look like two legs that were removed from the connecting hip piece.
Just keep everything in the same thread and we can walk you through it. After
the hair identification post I was looking at the legs and also assumed they
were broken off from a legs piece. They're too broad to be be the piece
referenced in the above post (IMO). Can you provide a higher resolution image?
Can anyone identify what the legs in this picture might be? Or what terms to
look for.
They look like two legs that were removed from the connecting hip piece.
I don't think so. The toes on the feet (if that is what they are called)
are square but the picture only has round ends. Shiny Stuff identified it correctly
with part #78257.
Jim
The legs are displayed toe to toe, so it's square in the middle and round
in the corners.
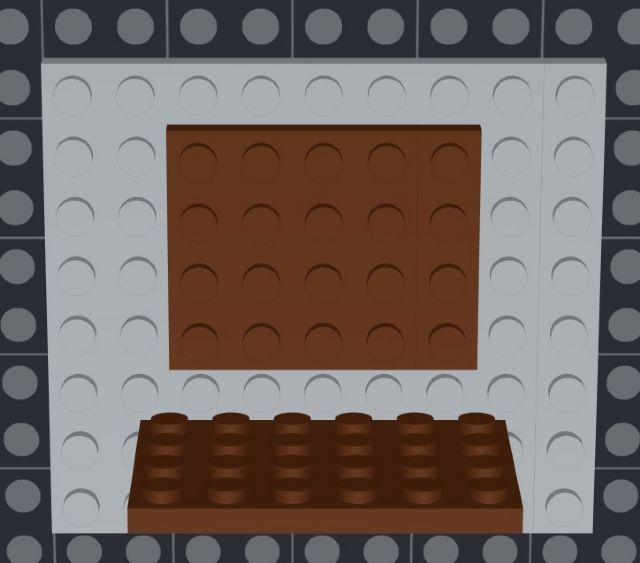
This is all super helpful, I think I have all the parts I need except what I
don't understand is the brown piece above the the pink dots - it is 6 across
centered over a five piece above. Are their pieces that will snap into the base
plate perpendicular? (like wise the green piece on the very bottom under the
pink)
This is all super helpful, I think I have all the parts I need except what I
don't understand is the brown piece above the the pink dots - it is 6 across
centered over a five piece above.
Just look like standard plates/tiles to me.
Are their pieces that will snap into the base
plate perpendicular?
It seems there’s 2 layers of vertical brown plates (5-stud width). That leaves
1 layer for jumpers and then the bracket and you can attach the platform.
But beware of the studs and their logo. For instance, behind the slopes 75,
if those are 1 stud (1 brick-width) from the gray baseplate, you can have 2½
plates behind them, that is two plates and hollow studs, the logos would
push the slopes.
So maybe the platform is a bit farther, and the bricks with side stud would do
that easily.
(like wise the green piece on the very bottom under the
pink)
How do you center a 6 stud base perpinducular to a 5 stud plate? I doesn't
make sense to me.
In Searching, SylvainLS writes:
In Searching, Jikoktljrw writes:
This is all super helpful, I think I have all the parts I need except what I
don't understand is the brown piece above the the pink dots - it is 6 across
centered over a five piece above.
Just look like standard plates/tiles to me.
Are their pieces that will snap into the base
plate perpendicular?
It seems there’s 2 layers of vertical brown plates (5-stud width). That leaves
1 layer for jumpers and then the bracket and you can attach the platform.
But beware of the studs and their logo. For instance, behind the slopes 75,
if those are 1 stud (1 brick-width) from the gray baseplate, you can have 2½
plates behind them, that is two plates and hollow studs, the logos would
push the slopes.
So maybe the platform is a bit farther, and the bricks with side stud would do
that easily.
(like wise the green piece on the very bottom under the
pink)
This is all super helpful, I think I have all the parts I need except what I
don't understand is the brown piece above the the pink dots - it is 6 across
centered over a five piece above. Are their pieces that will snap into the base
plate perpendicular? (like wise the green piece on the very bottom under the
pink)
I think you are now referring to thee image on your first post?
The vertical plates are not attached to the horizontal plates. They are both
attached to the Gray plate.
The side of the 4x6 brown plate that holds Buddha is attached to the gray plate,
sticking between the studs. With this technique you can slide the 6-studs brown
plate to center it with the 5-studs plate.
Also, the round dark green plates are 4x4 studs. On that regard please note that
the pink "dots" are attached mainly to the brown plate and not so much
to the dark green plates.
I am trying to create instructions in STUDIO - it doesn't seem to let me
slide the brown plate perpindular to the grey plate off center. Maybe a quirk
in the software.
In Searching, Give.Me.A.Brick writes:
In Searching, Jikoktljrw writes:
This is all super helpful, I think I have all the parts I need except what I
don't understand is the brown piece above the the pink dots - it is 6 across
centered over a five piece above. Are their pieces that will snap into the base
plate perpendicular? (like wise the green piece on the very bottom under the
pink)
I think you are now referring to thee image on your first post?
The vertical plates are not attached to the horizontal plates. They are both
attached to the Gray plate.
The side of the 4x6 brown plate that holds Buddha is attached to the gray plate,
sticking between the studs. With this technique you can slide the 6-studs brown
plate to center it with the 5-studs plate.
Also, the round dark green plates are 4x4 studs. On that regard please note that
the pink "dots" are attached mainly to the brown plate and not so much
to the dark green plates.
I am trying to create instructions in STUDIO - it doesn't seem to let me
slide the brown plate perpindular to the grey plate off center. Maybe a quirk
in the software.
It's considered by LEGO an illegal technique.
I can't help much with Studio, sorry. Sylvain, who posted here, is an ace
on studio.
There's also a Studio forum. You should check it out.
In Searching, Give.Me.A.Brick writes:
In Searching, Jikoktljrw writes:
This is all super helpful, I think I have all the parts I need except what I
don't understand is the brown piece above the the pink dots - it is 6 across
centered over a five piece above. Are their pieces that will snap into the base
plate perpendicular? (like wise the green piece on the very bottom under the
pink)
I think you are now referring to thee image on your first post?
The vertical plates are not attached to the horizontal plates. They are both
attached to the Gray plate.
The side of the 4x6 brown plate that holds Buddha is attached to the gray plate,
sticking between the studs. With this technique you can slide the 6-studs brown
plate to center it with the 5-studs plate.
Also, the round dark green plates are 4x4 studs. On that regard please note that
the pink "dots" are attached mainly to the brown plate and not so much
to the dark green plates.
I am trying to create instructions in STUDIO - it doesn't seem to let me
slide the brown plate perpindular to the grey plate off center. Maybe a quirk
in the software.
It's considered by LEGO an illegal technique.
Yes, and it’s not very solid, that’s why I didn’t propose it
Thanks for all the help in this thread. I made my creation.
In Searching, SylvainLS writes:
In Searching, Give.Me.A.Brick writes:
In Searching, Jikoktljrw writes:
I am trying to create instructions in STUDIO - it doesn't seem to let me
slide the brown plate perpindular to the grey plate off center. Maybe a quirk
in the software.
It's considered by LEGO an illegal technique.
Yes, and it’s not very solid, that’s why I didn’t propose it


")


")


)
)